Out in the wastes your factory finish won't last long!

As you'll see from the product images, for my own collection I'm a big fan of weathering - it might feel a little time consuming, but it let's me paint in a loose and fast way which I enjoy, and gives nice results.
There's lots of techniques out there, but one I don't see mentioned often is toothpaste weathering.
It's a lot like salt weathering, but for running along smaller panel edges with smaller detail I prefer the control it gives.
Before we begin: You need a clear coat!
I've made the mistake of trying to do this without a clear coat, and you're muuuuuuuuuch more likely to damage the 'rusty' undercoat. You'll also need an airbrush, but this is the exact type of project a super cheap airbrush can achieve nicely. You can even try it with spray cans.
I use Tamiya TS-80 as my clear coat for inbetween stages, but I have used Dullcote in the past (which I still use as my final matte coat) and it works well.
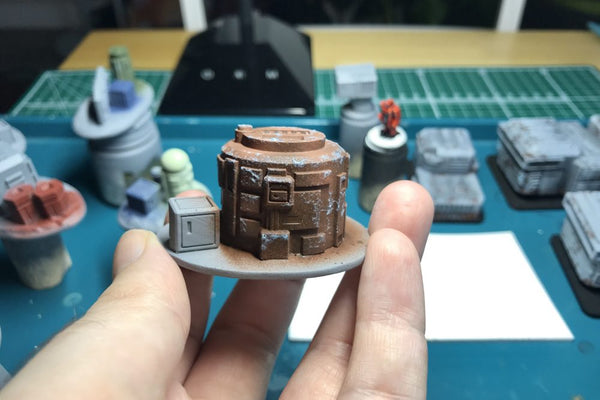
First up - prime your terrain. I like grey primer for terrain, but use whatever you prefer. Then you'll want to lay down a 'basecoat' of rusty colours - start from a mid-to-dark chocolate brown, then modulate it - splotches, orangey rust colours, patches - it will all look good.

Let this layer dry completely then give it a blast with your clear coat - you're not trying to totally give it a bomb-proof varnish, just to help seal the acrylic, so the next step (the wet stage!) doesn't do it too much harm. Now let the clear coat dry completely too.
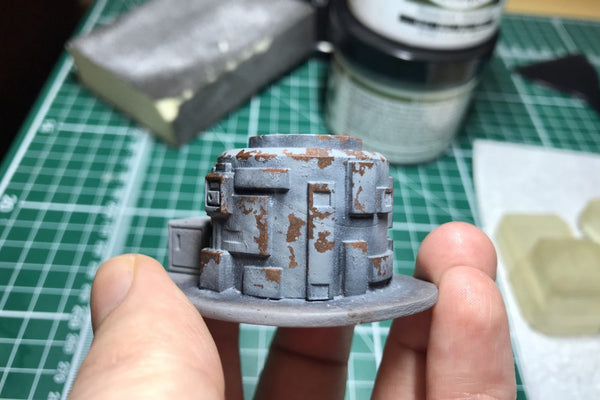
Now on to the fun bit! Using a small torn piece of sponge, dabble toothpaste along edges where you want to see rust coming through - areas of high friction, flat panels that flake and areas where water might pool. Much like salt weathering, the areas you apply the toothpaste to will be masked from the next layer of paint we spray down, and will show the rust through when it's washed away.
Use a cheap, white toothpaste - not the gel kind - and be subtle. This effect is much better if there's less rust and more paint when we're finished.
Notice that the toothpaste can have some body but be a little 'transparent' - a layer like this will still mask, so don't go crazy.
Now move on to laying down your basecoat with your airbrush using your normal techniques - pre-shading, zenith highlights - whatever you like. If you would usually apply clearcoats during any of these stages then don't - you don't want to seal the toothpaste from moisture.

(Sorry - not helpful that the colours I've used here are so similar to my primer, but you should just be able to see the toothpaste texture under the paint layer)
Now, let this all this airbrushed paint dry thoroughly - I'd leave at least 24 hours. Once you're happy it's cured, we move on to removing the toothpaste.
There's no point absolutely drenching the model to get the toothpaste off, so take a large, soft brush and wet it, then 'paint' water all over the model - like you were applying a thick basecoat. By the time you've finished, the area you started on should be soft enough to remove. Take a smaller, tougher brush and simply rub all the toothpaste away. It may foam a little, but don't worry about that for now, just keep working it until it's all gone, showing the rust layer underneath. Be sure not to be so rough you damage the 'rust' layer.
Then take your larger brush and re-do a few wet layers - this will help rinse away the foamed toothpaste and catch any bits you missed.
And that's it! You might find you need to wash over the model with another 'coat' or two of water to remove any remnants of toothpaste in the crevices, then let it dry.
Afterwards you can add whatever weathering techniques you like - more rust, pigment, panel highlights. Drybrushing won't really work easily, but everything else should.
If this works out nicely for you drop me a comment with a link, it'd be great to see.
That’s really interesting. I’d never heard of this before, but will give it a go on my next terrain project.